
CT CROSS SECTIONAL ANATOMY
BRAIN LESSON
In this lesson you will learn CT cross sectional brain anatomy. This lesson is divided into four sections. The first section discusses CT brain imaging. The second section offers introductory brain anatomy. The third section offers actual CT brain images at different levels of the scan with labeled anatomy for learning, figures depicting where the level of the scan is in relationship to the body, and labeling activities for some of the learning sections to test the anatomy presented at each specific level. The last section offers "Hot Spot" quizzes on actual CT images to reinforce all of the anatomy presented in sections 2 & 3. Let's begin. Continue on to the next page to start Section 1.
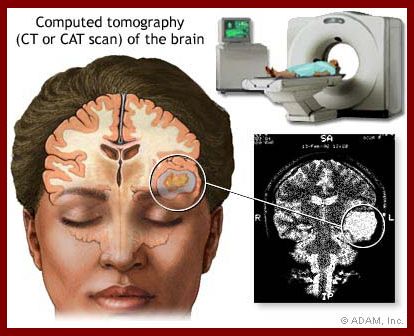
SECTION 1: ABOUT CT BRAIN IMAGING
A CT scan of the brain is done to detect:
*bleeding, brain injury and skull fractures
*bleeding due to a ruptured/leaking aneurysm in a patient with a sudden severe headache
*a blood clot or bleeding within the brain shortly after a patient exhibits symptoms of a stroke
*brain tumors
*enlarged brain cavities in patients with hydrocephalus
*diseases/malformations of the skull
*the extent of bone & soft tissue damage in patients with facial trauma & those planning surgical reconstruction
*diseases of the temporal bone on the side of the skull, which may be causing hearing problems
*inflammation or other changes are present in the paranasal sinuses
*specifics when planning radiation therapy for cancer of the brain or other tissues
*the passage of a needle used to obtain a tissue sample (biopsy) from the brain
*arteriovenous malformations
SECTION 2: INTRODUCTORY BRAIN ANATOMY
Because the brain is so complex, in this section we are going to present you with some introductory brain anatomy before we start teaching the cross sectional anatomy of the brain. There are four parts to this section. Continue on to the next page to begin.
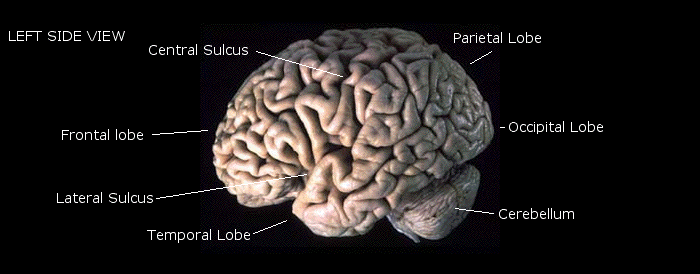
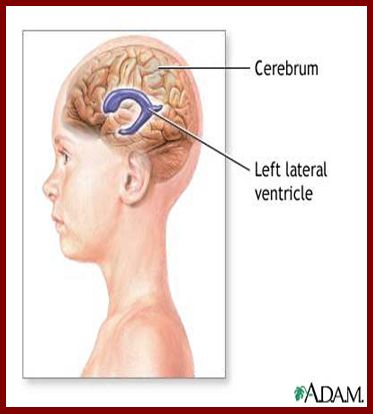
First, are the regions of the brain. These regions include the frontal lobe, parietal lobe, occipital lobe, temporal lobe, brain stem, cerebellum, and spinal cord. The cerebrum is the largest part of the brain and is composed of the different lobes. The cerebrum controls perception, imagination, thought judgment, and decisions.
Locate these parts of the brain on the image below.
Second, on this page and the next, are brain images illustrating the lateral ventricles located within the cerebrum.
The entire surface of the Central Nervous System (CNS) is bathed by a clear, colorless fluid called Cerebral Spinal Fluid (CSF) which is contained within a system of fluid-filled cavities called ventricles. CSF is the cushiony fluid that protects the brain and spine from trauma and is produced by a cluster of blood vessels that line the ventricles. These clusters of blood vessels are known as the choroid plexus. Together, the ventricles of the brain hold about a glassful of CSF.
The CSF flowing through the ventricles has several functions including:
The lateral ventricles are the largest of the ventricles and have an irregular shape. Parts of the lateral ventricles include:

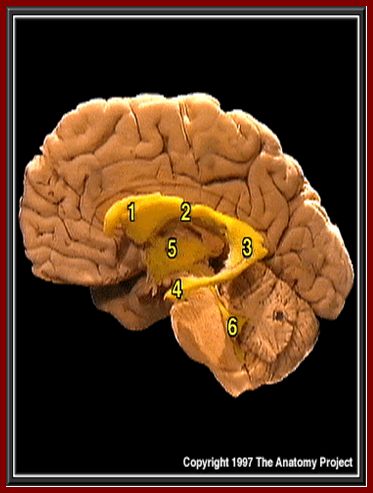
Third, is an image depicting all of the ventricles. The ventricular system consists of four ventricles. These are the right and left lateral ventricles, the third ventricle, and the fourth ventricle. The lateral ventricles both communicate via the interventricular foramina with the third ventricle, found centrally within the diencephalon. The lateral ventricles consist of two curved openings that conform to the shape of each half of the brain. Their shape is often likened to a horseshoe. There is one lateral ventricle on each side of the brain that pass though all four lobes, providing a pathway for the CSF. The third ventricle communicates via the cerebral aqueduct, located within the midbrain, with the fourth ventricle, found within the hindbrain. The three foramina to the subarachnoid space are found here, permitting CSF produced in the ventricles to surround the brainstem, cerebellum, and cerebral cortex. The fourth ventricle is also continuous with the central canal, allowing CSF to bathe the inside surface of the spinal cord as well.
Locate the following on the image below:
1 = ANTERIOR HORN OF LATERAL VENTRICLE
2 = BODY OF LATERAL VENTRICLE
3 = POSTERIOR HORN OF LATERAL VENTRICLE
4 = INFERIOR HORN OF LATERAL VENTRICLE
5 = 3RD VENTRICLE
6 = 4TH VENTRICLE
Last, is a series of images, in slide show form, illustrating the Circle of Willis. The Circle of Willis (also called the cerebral arterial circle, arterial circle of Willis, or Willis Polygon) is a circle of arteries that supply blood to the brain. It is named after Thomas Willis (1621–1673), an English physician. The Circle of Willis is made up of the following major components:
The Basilar Artery (BA) and Middle Cerebral Arteries (MCA) supply the brain and are also important components but are not considered part of the circle. Open the slide show below and click through the slide images to begin learning about the Circle of Willis.


Now that you have learned the components of the Circle of Willis, try doing the labeling activity below.

SECTION 3: LEARNING CROSS SECTIONAL BRAIN ANATOMY
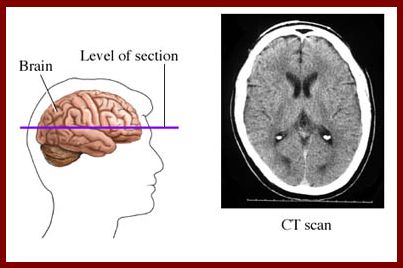
In this section, you will be presented with several images and figures illustrating the cross sectional brain anatomy that you will be learning. For each "level" or "axial section," there will be an actual CT brain image that is labeled and figures depicting where the scan is in the body. Throughout this section there will be labeling activities to test your recollection of the anatomy presented. Study each of the labeled CT images, associate that image with where it is in the body, and test yourself by doing the activities as they arise.
Please note that because everyone's anatomy is different, the anatomy demonstrated at a specific level may be different from scan to scan. Keep this in mind when learning the anatomy presented and doing the labeling activities. The scans are matched up as accurate as possible, but that doesn't mean that all of the learned anatomy is present in the labeling activity or that it looks exactly the same from image to image. If you find this to be the case, don't be alarmed. Use the knowledge that you have gained to adapt and label the anatomy that is present in that image. Let's start!
Continue on to the next page for images at Axial Section 1.
(labeling activity images taken from Koritke'/Sick, Atlas of Sectional Human Anatomy: Second Edition)
The following axial slides are arranged superior to inferior.
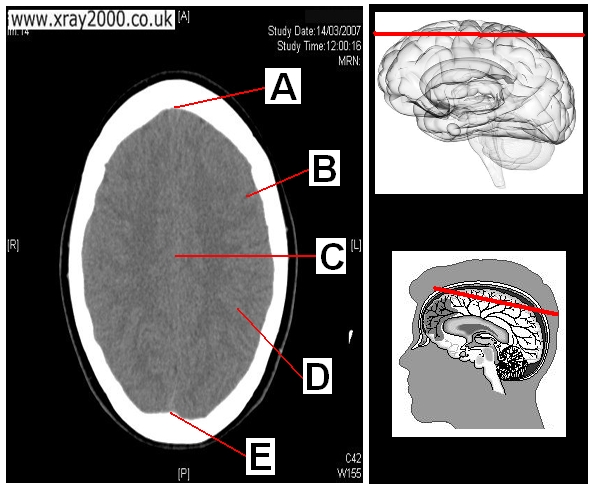
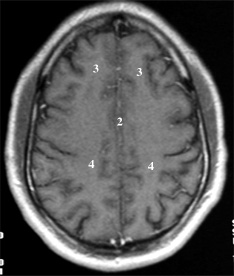
AXIAL SECTION 1:
Axial section 1 is approximately 7.5 cm above the OML. On the image below, locate the following anatomy:
A. Frontal bone
B. Sulci (a depression or fissure)
C. Falx cerebri on the longitudinal fissure
D. Gyrus (a ridge)
E. Superior sagittal sinus
Now that you have learned the anatomy, do the labeling activity below. Just click on the "labeling activity" icon.

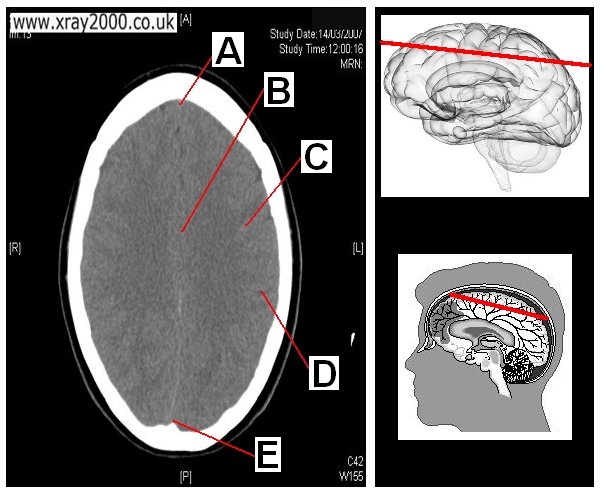
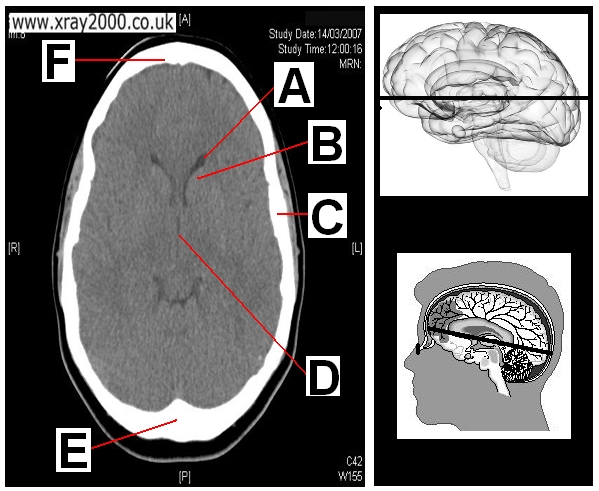
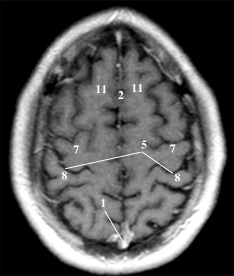
AXIAL SECTION 2:
Axial section 2 is approximately 6 cm above the OML. On the image below, locate the following anatomy:
A. Frontal bone
B. Corpus Collosum
C. Gyrus
D. Sulci
E. Superior sagittal sinus
Now that you have learned the anatomy, do the labeling activity below. Just click on the "labeling activity" icon.
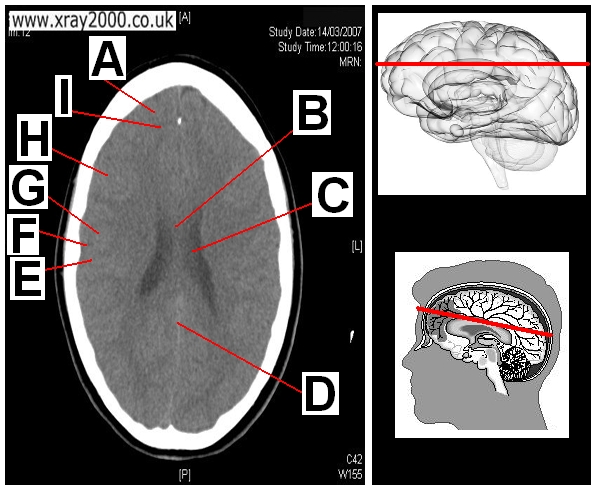
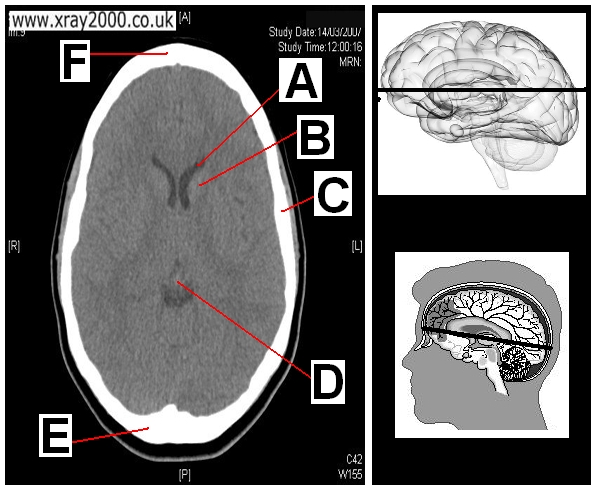
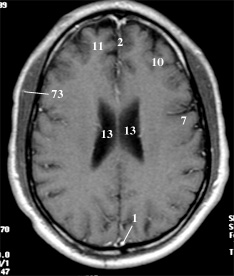
AXIAL SECTION 3:
Axial section 3 is less than 6 cm above the OML. On the image below, locate the following anatomy:
A. Superior frontal gyrus
B. Corpus collosum
C. Body of lateral ventricle
D. Inferior sagittal sinus
E. Postcentral gyrus
F. Central sulcus
G. Precentral gyrus
H. Middle frontal gyrus
I. Superior frontal sulcus
Now that you have learned the anatomy, do the labeling activity below. Just click on the "labeling activity" icon.
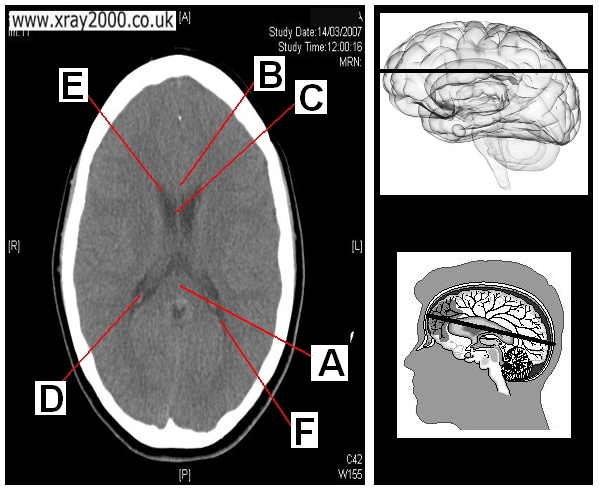
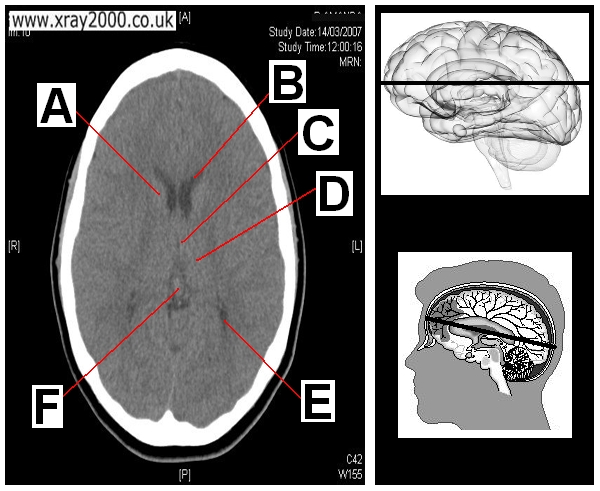
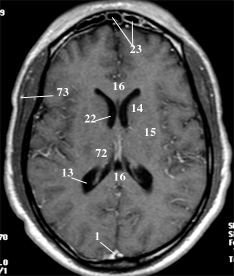
AXIAL SECTION 4:
Axial section 4 is approximately 4.5 cm above the OML. On the image below, locate the following anatomy:
A. Splenium of corpus collosum
B. Genu of corpus collosum
C. Septum pellucidum
D. Choroid plexus
E. Anterior horn of lateral ventricle
F. Posterior horn of lateral ventricle
Now that you have learned the anatomy, do the labeling activity below. Just click on the "labeling activity" icon.
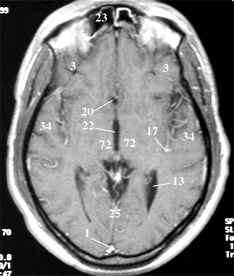
AXIAL SECTION 5:
Axial section 5 is less than 4.5 cm above the OML. On the image below, locate the following anatomy:
A. Head of caudate nucleus
B. Anterior horn of lateral ventricle
C. 3rd ventricle
D. Thalamus
E. Posterior horn of lateral ventricle
F. Pineal gland
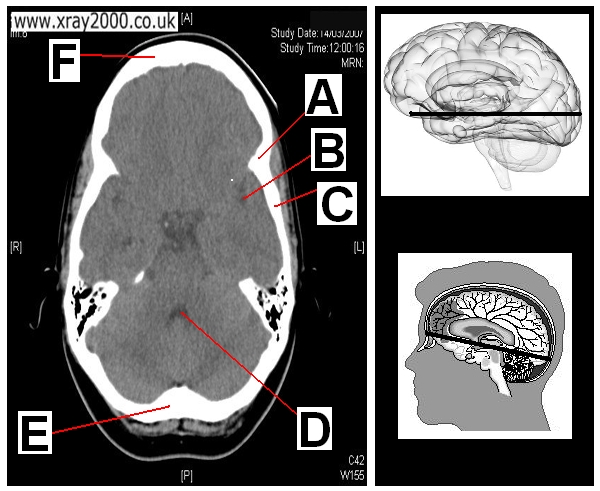
AXIAL SECTION 6:
Axial section 6 is approximately 4 cm above the OML. On the image below, locate the following anatomy:
A. Anterior horn of lateral ventricle
B. Caudate nucleus
C. Parietal bone
D. Pineal gland
E. Occipital bone
F. Frontal bone
Now that you have learned the anatomy, do the labeling activity below. Just click on the "labeling activity" icon.
AXIAL SECTION 7:
Axial section 7 is less than 4 cm above the OML. On the image below, locate the following anatomy:
A. Anterior horn of lateral ventricle
B. Caudate nucleus
C. Parietal bone
D. 3rd ventricle
E. Occipital bone
F. Frontal bone
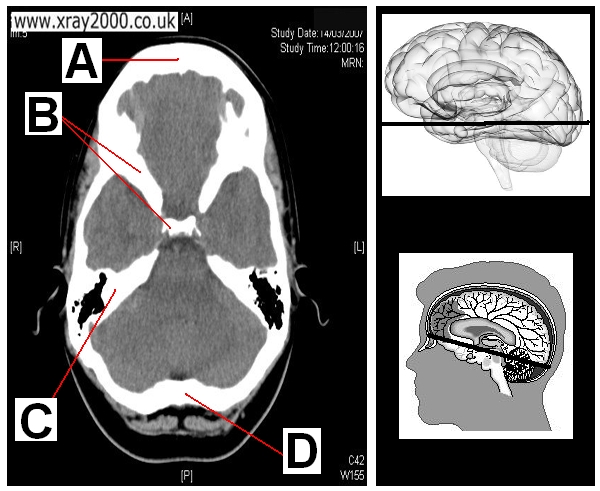
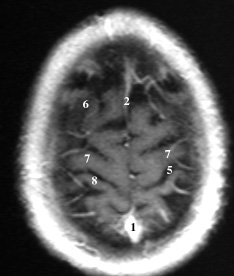
AXIAL SECTION 8:
Axial section 8 is approximately 3 cm above the OML. On the image below, locate the following anatomy:
A. Third ventricle
B. Parietal bone
C. Occipital bone
D. Frontal bone
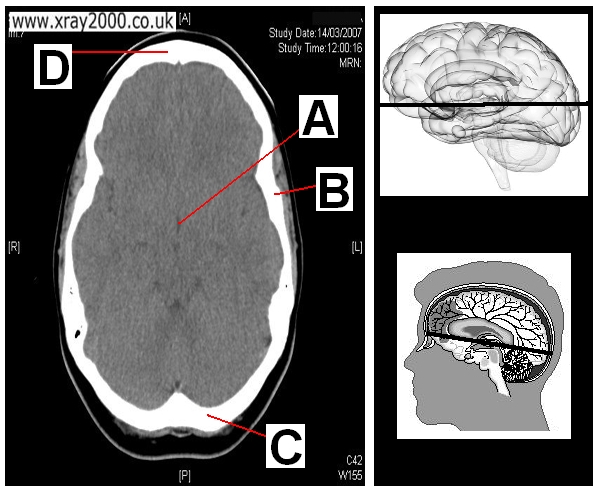
Now that you have learned the anatomy, do the labeling activity below. Just click on the "labeling activity" icon.
AXIAL SECTION 9:
Axial section 9 is approximately less than 3 cm above the OML. On the image below, locate the following anatomy:
A. Parietal bone
B. Lateral sulcus
C. Temporal bone
D. 4th ventricle
E. Occipital bone
F. Frontal bone
Now that you have learned the anatomy, do the labeling activity below. Just click on the "labeling activity" icon.
AXIAL SECTION 10:
Axial section 10 is approximately 2 cm above the OML. On the image below, locate the following anatomy:
A. Frontal bone
B. Sphenoid bone
C. Temporal bone
D. Occipital bone
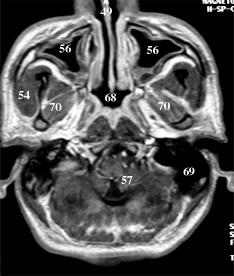
AXIAL SECTION 11:
Axial section 11 is less than 2 cm above the OML. On the image below, locate the following anatomy:
A. Frontal sinus
B. Frontal lobe
C. Sphenoid sinus
D. Mastoid air cells
E. Cerebellum
F. Occipital bone (crest)
G. Petrous bones
H. Sphenoid bone

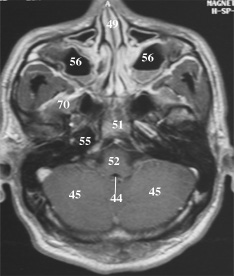
AXIAL SECTION 12:
Axial section 12 is 1 cm above the OML. On the image below, locate the following anatomy:
A. Sphenoid bone
B. Mastoid air cells
C. External auditory canal
D. Orbit
E. Frontal Sinus

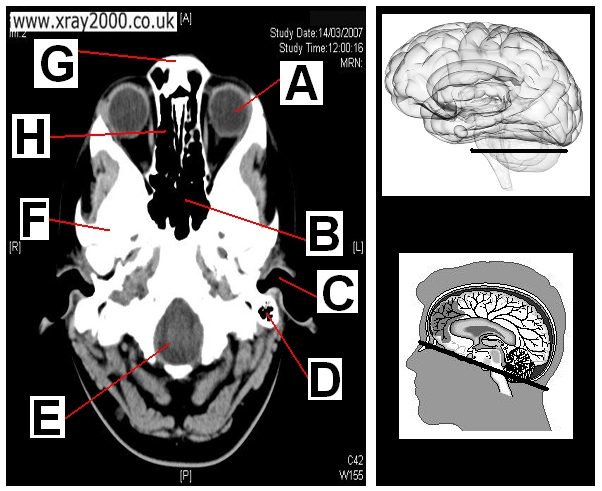
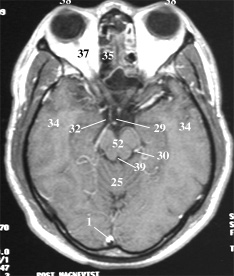
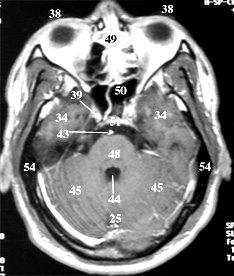
AXIAL SECTION 13:
Axial section 13 is .5cm above the OML. On the image below, locate the following anatomy:
A. Globe
B. Sphenoid sinus
C. External auditory canal
D. Mastoid air cells
E. Medulla oblongata through the foramen magnum
F. Sphenoid bone
G. Nasal bone
H. Ethmoid sinus within the ethmoid labyrinth
AXIAL SECTION 14:
Axial section 14 is at the OML. On the image below, locate the following anatomy:
A. Nasal septum
B. Lens of the eye
C. Globe
D. Zygomatic bone
E. Ethmoid sinus
F. C2
G. C1
H. Maxillary sinus
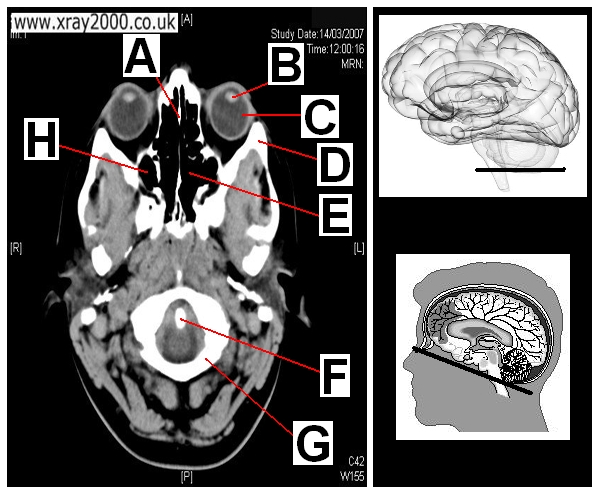
Now that you have learned the anatomy, do the labeling activity below. Just click on the "labeling activity" icon.
SECTION 4: CROSS SECTIONAL BRAIN ANATOMY TESTING
As discussed on page 2, in this section you will be presented with "Hot Spot" quizzes on actual CT images to reinforce the anatomy presented in sections 2 & 3. Again, because all anatomy is different, all of the labeled anatomy may not be used. Some quizzes may have a limited number of selections. They are a series of CT images, arranged in the order the scan was taken. To begin, continue on to the next page.
Hot Spot Quiz #1

Hot Spot Quiz #2
Hot Spot Quiz #3
Hot Spot Quiz #4
Hot Spot Quiz #5
Hot Spot Quiz #6
Hot Spot Quiz #7
Hot Spot Quiz #8
Hot Spot Quiz #9
Hot Spot Quiz #10
THAT COMPLETES THIS LESSON!